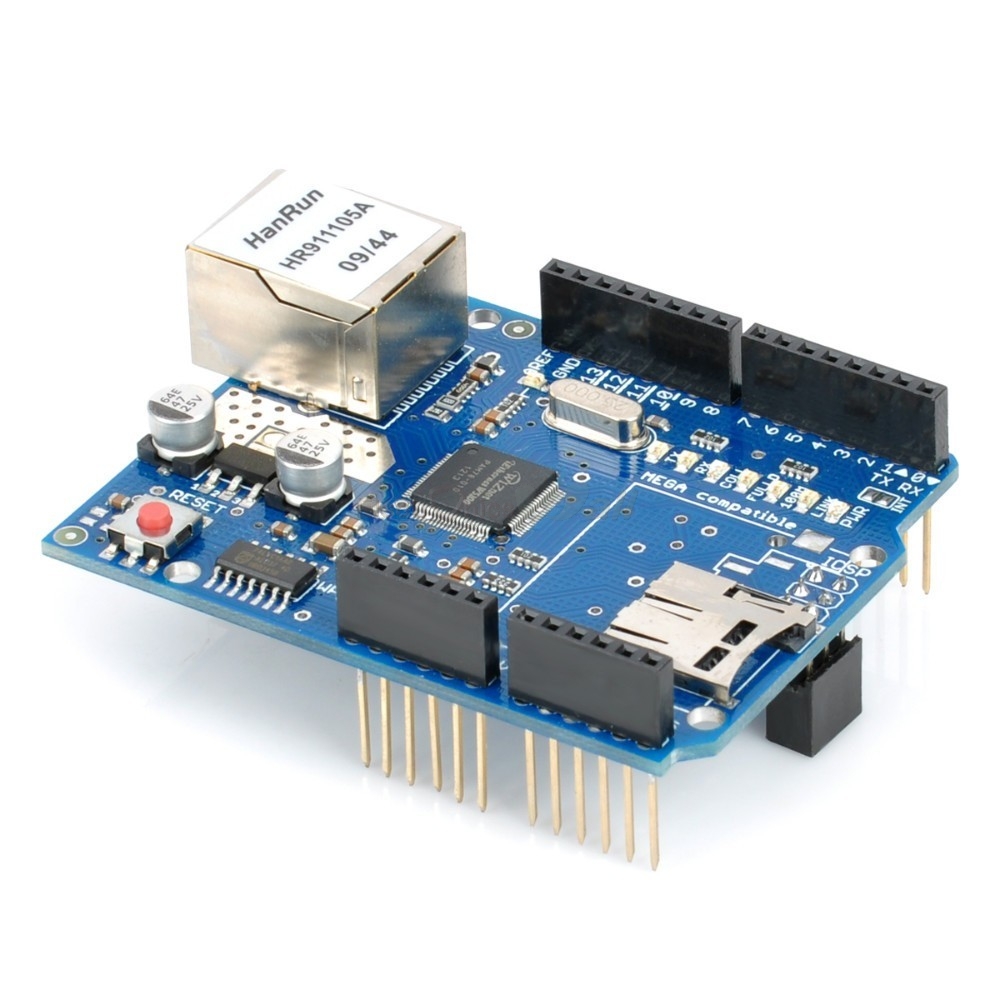
Arduino Ethernet Shield W5100
This is a Ethernet shield based on the Wiznet W5100 ethernet chip,compatible with Arduino Ethernet Shield,added support to Arduino Mega. The different between with Arduino Ethernet Shield just Layout of Ethernet port location. It is based on the Wiznet W5100 ethernet chip providing a network (IP) stack capable of both TCP and UDP. The Arduino Ethernet Shield supports up to four simultaneous socket connections. Use theEthernet library to write sketches which connect to the internet using the shield.
The latest revision of the shield adds a micro-SD card slot, which can be used to store files for serving over the network. It is compatible with the Arduino Duemilanove and Mega (using the Ethernet library coming in Arduino 0022). An SD card library is not yet included in the standard Arduino distribution, but the sdfatlib by Bill Greiman works well. See this tutorial from Adafruit Industries for instructions (thanks Limor!).
Documents:
- Datasheet
- Schematic
- Reference Design
- Getting Started
- Bildr Tutorial (Server)
- Bildr Tutorial (Client)
MAC Adress: " 0xDE, 0xAD, 0xBE, 0xEF, 0xFE, 0xED "
Sample Test code:
* Web Server
*
* A simple web server that shows the value of the
*/
#include
byte mac[] = { 0xDE, 0xAD, 0xBE, 0xEF, 0xFE, 0xED };
byte ip[] = { 192, 168, 0, 15 };
Server server(80);
void setup()
{
Ethernet.begin(mac, ip);
server.begin();
}
void loop()
{
Client client = server.available();
if (client) {
// an http request ends with a blank line
boolean current_line_is_blank = true;
while (client.connected()) {
if (client.available()) {
char c = client.read();
// if we have gotten to the end of the line (received a
// character) and the line is blank, the http request
// so we can send a reply
if (c == "n" && current_line_is_blank) {
// send a standard http response header
client.println("HTTP/1.1 200 OK");
client.println("Content-Type: text/html");
client.println();
client.print("welcome to B2CQSHOP");
client.println("
");
client.print
client.println("
");
client.print("");
client.println("
");
client.print
client.println("
");
for (int i = 0; i < 6; i++) {
client.print("analog input ");
client.print(i);
client.print(" is ");
client.print(analogRead(i));
client.println("
");
}
break;
}
if (c == "n") {
// we are starting a new line
current_line_is_blank = true;
} else if (c != "r") {
// we have gotten a character on the current line
current_line_is_blank = false;
}
}
}
client.stop();
}
}
Tutorial:
Get familiar
Before you do this tutorial you willl want to get familiar with what you are working on. This is not a beginner tutorial, its best used by those who already have quite a bit Arduino or microcontroller experience and are "fluent" in C/C++/Java!
Also, read up on how to use the Ethernet shield and Ethernet library . Then review the notes on SD card usage and installing the library you will be using
You should have already gotten the Ethernet shield working with your network setup, too.
You can download the latest code from GitHub (click Download Source in the top right)
Initializing Micro-SD card on an Ethernet shield
The latest Arduino Ethernet shield comes with a handy MicroSD card slot so that you can store and retrieve data through the shield. Very handy! Lets show how to talk to the card.
Be sure to have the very latest version of SdFatLib , as you"ll need some of the newer capabilities!
First thing to note is that the SS (Slave Select) pin for the card is digital 4 (although as of the writing of this mini-tutorial, the schematic hasn"t been updated)
Open up the SdFatInfo example sketch and change the line in loop() from
uint8_t r = card.init(SPI_HALF_SPEED);
To:
 pinMode(10, OUTPUT); // set the SS pin as an output (necessary!)
 digitalWrite(10, HIGH); // but turn off the W5100 chip!
 uint8_t r = card.init(SPI_HALF_SPEED, 4); // Use digital 4 as the SD SS line
Be sure to add those two extra lines right before-hand! They Enable the SPI interface. If you are on a Mega, use pin 53 instead of 10
Now upload and test the card, you should see something like this:
Indicating you talked to the card all right
List files
Put some text files on your SD card, using a computer, so that you have data to read. Make sure they are in the root directory, and not in a folder
Then run the SdFatLs example sketch from the SdFat library, you should see it list all the files you have on the card, again, you will have to make the changes from above to update the card.init() part to the new SS pin
For example, the card we will be using has two files on it from some previous datalogging.
Merge WebServer + SdFatLs
We will begin by combining WebServer (the example sketch that comes with the Ethernet lib) and SdFatLs to make a web server that lists the files on the SD card.You can download the file here (you will need to copy&paste it, do so carefully!)then follow along!
Part one is the Ethernet and SD card objects and a simple error function (void error_P(const char* str)) that prints out errors and halts the program if there are serious problems.
You should, of cousre, set your mac and ip as necessary, use the ip and mac that worked from your previous Ethernet shield explorations!
The card, volume, and root are objects that help us traverse the complex structure of an SD card
The error function is not too exciting, it just prints out the error and sits in a while(1); loop forever
/*
 * This sketch will list all files in the root directory and
 * then do a recursive list of all directories on the SD card.
 *
 */

#include
#include
#include

/%%**%%%%**%%%%**%%%%**%%%%**%%%%**%% ETHERNET STUFF %%**%%%%**%%%%**%%%%**%%%%**%%%%**%%/
byte mac[] = { 0xDE, 0xAD, 0xBE, 0xEF, 0xFE, 0xED };
byte ip[] = { 192, 168, 1, 177 };
Server server(80);

/%%**%%%%**%%%%**%%%%**%%%%**%%%%**%% SDCARD STUFF %%**%%%%**%%%%**%%%%**%%%%**%%%%**%%/
Sd2Card card;
SdVolume volume;
SdFile root;

// store error strings in flash to save RAM
#define error(s) error_P(PSTR(s))

void error_P(const char* str) {
 PgmPrint("error: ");
 SerialPrintln_P(str);
 if (card.errorCode()) {
 PgmPrint("SD error: ");
 Serial.print(card.errorCode(), HEX);
 Serial.print(",");
 Serial.println(card.errorData(), HEX);
 }
 while(1);
}
Part 2 is the setup() function. It sets up the Serial object so we can debug the connection in real time. It then prints out the RAM usage. You will need aAtmega328Arduino for this experiment, and you should see at leat 1000 bytes of RAM free. Once this gets to under 250 bytes, you may be running too low!
Then we do the trick where we make the hardware SS pin #10 to an OUTPUT and HIGH to disable the wiznet chip while we check the card contents. If you are on a Mega, change this to 53. Then we initialize the card which should go fine since you already tested this before
Then we verify the card structure, print out all the files, and print "Done!". Finally we stuck the Ethernet initialization code at the end here! Now we have both the Ethernet and SD card working
void setup() {
 Serial.begin(9600);

 PgmPrint("Free RAM: ");
 Serial.println(FreeRam());

 // initialize the SD card at SPI_HALF_SPEED to avoid bus errors with
 // breadboards. use SPI_FULL_SPEED for better performance.
 pinMode(10, OUTPUT); // set the SS pin as an output (necessary!)
 digitalWrite(10, HIGH); // but turn off the W5100 chip!

 if (!card.init(SPI_HALF_SPEED, 4)) error("card.init failed!");

 // initialize a FAT volume
 if (!volume.init(&card)) error("vol.init failed!");

 PgmPrint("Volume is FAT");
 Serial.println(volume.fatType(),DEC);
 Serial.println();

 if (!root.openRoot(&volume)) error("openRoot failed");

 // list file in root with date and size
 PgmPrintln("Files found in root:");
 root.ls(LS_DATE | LS_SIZE);
 Serial.println();

 // Recursive list of all directories
 PgmPrintln("Files found in all dirs:");
 root.ls(LS_R);

 Serial.println();
 PgmPrintln("Done");

 // Debugging complete, we start the server!
 Ethernet.begin(mac, ip);
 server.begin();
}
We will skip ahead to the loop() where we wait for clients (checking via server.available()) and then read the client request before responding. This is basically copy-and-pasted from the Webserver example sketch that comes with the Ethernet library (well, the first and last parts of the loop are at least).
There is a little trick where to simplify the code, the writer of this sketch doesn"t actually check to see what file the web browser wants, it always spits out the same thing. In this case, we are going to have it spit out the files by using a helper function called ListFiles(client, 0) which we skipped over but will show next. The 0 in the second argument to the function just tells the function whether to print out the file sizes
void loop()
{
 Client client = server.available();
 if (client) {
 // an http request ends with a blank line
 boolean current_line_is_blank = true;
 while (client.connected()) {
 if (client.available()) {
 char c = client.read();
 // if we have gotten to the end of the line (received a newline
 // character) and the line is blank, the http request has ended,
 // so we can send a reply
 if (c == "
" && current_line_is_blank
               Videos Will be available Soon........


 PROTOSHIELD + MINI PROTOBOARD FOR ARDUINO UNO
 TF SD Card Arduino shield
 PROTOSHIELD V3 + MINI PROTOBOARD FOR ARDUINO MEGA
 Multi-function Shield for Arduino Boards / UNO /Mega 25...
 IOT Application 4 channel 5v Relay Arduino Shield Modul...
 ARDUINO LCD 1602 (16x2)KEYPAD SHIELD (BLUE LCD)
 Arduino Stepper Motor/Servo/DC Motor Shield
 Arduino Sensor Shield V8.0
 Colors Shield 8X8 RGB LED Matrix Driver Module for Ard...
 LCD Display 2.8 inch 240X320 TFTScreen Shield for Ardui...


