
KEYPAD SHIELD (BLUE LCD)")
 PROTOSHIELD + MINI PROTOBOARD FOR ARDUINO UNO
 TF SD Card Arduino shield
 PROTOSHIELD V3 + MINI PROTOBOARD FOR ARDUINO MEGA
 Multi-function Shield for Arduino Boards / UNO /Mega 25...
 IOT Application 4 channel 5v Relay Arduino Shield Modul...
 Vibration Sensor Module for Arduino Electronic Brick Sh...
 Arduino Stepper Motor/Servo/DC Motor Shield
 _ 2.4G 25dBm 802.11b /g /n Transceiver _ High Power Stable IoT Board") ESP8266 ESP-06 Serial WiFi Wireless Module (Chip) _ 2.4...
ESP8266 ESP-06 Serial WiFi Wireless Module (Chip) _ 2.4...
 Arduino Sensor Shield V8.0
 Colors Shield 8X8 RGB LED Matrix Driver Module for Ard...
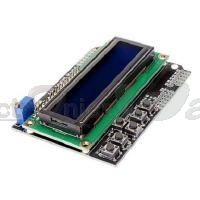
ARDUINO LCD 1602 (16x2)KEYPAD SHIELD (BLUE LCD)
This is a very popular LCD Keypad shield for Arduino or Freeduino board. It includes a 2x16 LCD display and 6 momentary push buttons. Pins 4, 5, 6, 7, 8, 9 and 10 are used to interface with the LCD. Analog Pin 0 is used to read the pushbuttons. The LCD shield supports contrast adjustment and backlit on/off functions. It also expands analog pins for easy analog sensor reading and display.
Introduction
This is a very popular LCD Keypad shield for Arduino or Freeduino board. It includes a 2x16 LCD display and 6 momentary push buttons. Pins 4, 5, 6, 7, 8, 9 and 10 are used to interface with the LCD. Analog Pin 0 is used to read the pushbuttons. The LCD shield supports contrast adjustment and backlit on/off functions. It also expands analog pins for easy analog sensor reading and display.
Specification
- Operating Voltage:5V
- 6 Push buttons
- Expanded Analog Pinout with standard DFRobot configuration
Documents
Tutorial:
Introduction
The LCD Keypad shield is developed for Arduino compatible boards, to provide a user-friendly interface that allows users to go through the menu, make selections etc. It consists of a 1602 white character blue backlight LCD. The keypad consists of 5 keys — select, up, right, down and left. To save the digital IO pins, the keypad interface uses only one ADC channel. The key value is read through a 5 stage voltage divider.
Note: Version 1.1 main updates are the button values, which have being updated on the example code. For older version
check the comments and edit, or use the Enhanced V1.0 library 
Diagram
 Diagram
Pin Allocation
| Pin | Function |
|---|---|
| Analog 0 | Button (select, up, right, down and left) |
| Digital 4 | DB4 |
| Digital 5 | DB5 |
| Digital 6 | DB6 |
| Digital 7 | DB7 |
| Digital 8 | RS (Data or Signal Display Selection) |
| Digital 9 | Enable |
| Digital 10 | Backlit Control |
Sample Code
Example use of LiquidCrystal library
//Sample using LiquidCrystal library#include /*******************************************************This program will test the LCD panel and the buttonsMark Bramwell, July 2010********************************************************/// select the pins used on the LCD panelLiquidCrystal lcd(8, 9, 4, 5, 6, 7);// define some values used by the panel and buttonsint lcd_key = 0;int adc_key_in = 0;#define btnRIGHT 0#define btnUP 1#define btnDOWN 2#define btnLEFT 3#define btnSELECT 4#define btnNONE 5// read the buttonsint read_LCD_buttons(){ adc_key_in = analogRead(0); // read the value from the sensor // my buttons when read are centered at these valies: 0, 144, 329, 504, 741 // we add approx 50 to those values and check to see if we are close if (adc_key_in > 1000) return btnNONE; // We make this the 1st option for speed reasons since it will be the most likely result // For V1.1 us this threshold if (adc_key_in < 50) return btnRIGHT; if (adc_key_in < 250) return btnUP; if (adc_key_in < 450) return btnDOWN; if (adc_key_in < 650) return btnLEFT; if (adc_key_in < 850) return btnSELECT; // For V1.0 comment the other threshold and use the one below:/* if (adc_key_in < 50) return btnRIGHT; if (adc_key_in < 195) return btnUP; if (adc_key_in < 380) return btnDOWN; if (adc_key_in < 555) return btnLEFT; if (adc_key_in < 790) return btnSELECT; */ return btnNONE; // when all others fail, return this...}void setup(){ lcd.begin(16, 2); // start the library lcd.setCursor(0,0); lcd.print("Push the buttons"); // print a simple message} void loop(){ lcd.setCursor(9,1); // move cursor to second line "1" and 9 spaces over lcd.print(millis()/1000); // display seconds elapsed since power-up lcd.setCursor(0,1); // move to the begining of the second line lcd_key = read_LCD_buttons(); // read the buttons switch (lcd_key) // depending on which button was pushed, we perform an action { case btnRIGHT: { lcd.print("RIGHT "); break; } case btnLEFT: { lcd.print("LEFT "); break; } case btnUP:
|


